In Can All Your Students Watch and Learn? Part 1: Video and Audio Accessibility Considerations, we identified three types of pre-recorded time-based media and four alternatives for making them accessible. Here in Part 2, we focus on the how of high-quality captions for pre-recorded video + audio content and their essential elements of correct dialogue, clear speaker identification, and critical non-speech sounds.
Whether you’re creating original audio-visual material or sourcing from YouTube or elsewhere, high-quality captions for these media are critical to unlocking the ideas and information that—without the captions—are available only by ear.
Captions are the text equivalent of audio details, displayed in real time as the video plays. They bring the full auditory experience to the screen for learners who can see the visuals but can’t hear the audio. Often confused with captions, subtitles assume that the viewer can hear the audio and needs only a translation or transcription of the spoken words. Captions, however, provide the necessary context that subtitles omit.
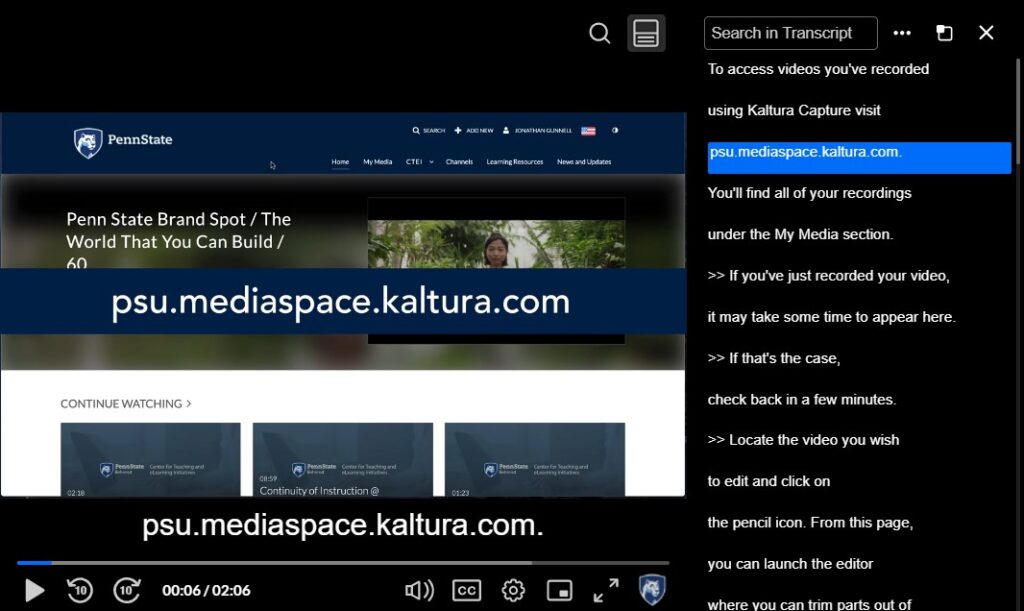
To implement captions, we use and recommend Kaltura, Penn State University’s one-stop media management platform (Figure 1). True captions aren’t auto-generated, but Kaltura’s auto-generated captions are a valuable, time-saving start. Below, we discuss the necessary components of captions and how you can achieve them.
For more information about Kaltura and for selected technical instructions, please refer to the Additional Resources section at the end of this post.

Figure 1: Kaltura Video Player
The Essential Elements of High-Quality Captions
Auto-generated captions rely on automatic speech recognition (ASR) technology and struggle with accuracy, missing context, and readability issues. But with auto-captions as a first draft, we can then edit them to include what is widely recognized as the three essential elements of high-quality captions:
- correct dialogue,
- clear speaker identification, and
- critical non-speech sounds.
While no universal style guide for captions exists, following are some best practices and examples to help you achieve each element.
Correct Dialogue
Ideally, captions should “capture” every spoken word exactly as it’s delivered, reflecting the speaker’s natural pauses, grammatical quirks, and informal phrasing. Revise auto-generated captions where needed for spelling, missing or extra words, and punctuation while being true to the speaker. The goal isn’t to “clean up” the dialogue but to accurately represent what the speaker intended, ensuring that all learners can follow along without the audio playing.
Some exceptions to “clean up” do exist. If a speaker uses profanity, for example, it’s acceptable to replace the word with a description (e.g., [bleep]). Filler words such as “um” or “uh” can be omitted unless they contribute to the tone or meaning. If unrelated dialogue occurs, we can summarize it for clarity (e.g., [participants discuss the weather while the presenter reboots their computer]). And finally, if a word or phrase cannot be understood, it’s better to indicate it with [unintelligible] rather than guess.
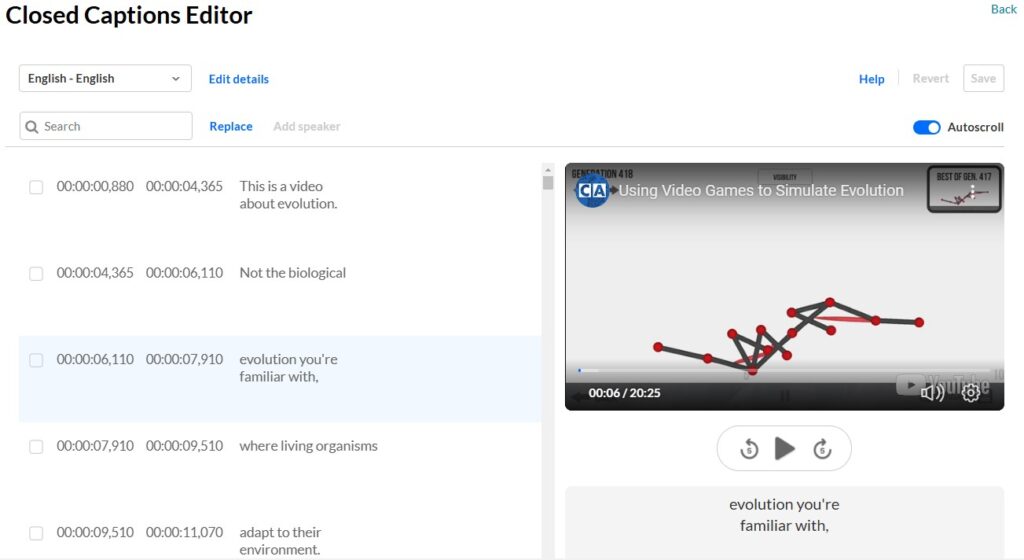
Captions should typically be limited to 1-2 lines, with about 32 characters per line, including spaces. This practice ensures readability and prevents text from overwhelming the screen. (For reference, “Things that go bump in the night” contains 32 characters, with spaces.) Break lines at logical pauses or between phrases to enhance clarity. Kaltura’s auto-captions often default to two lines (Figure 2), but you may need to refine the breaks for readability during your editing process.

Figure 2: Kaltura Closed Captions (CC) Editor
Clear Speaker Identification
In videos where it’s unclear who is speaking based on visuals alone, captions should identify the speaker to ensure the dialogue makes sense. This practice is especially important in multi-person discussions, interviews, or scenarios where off-screen voices are present.
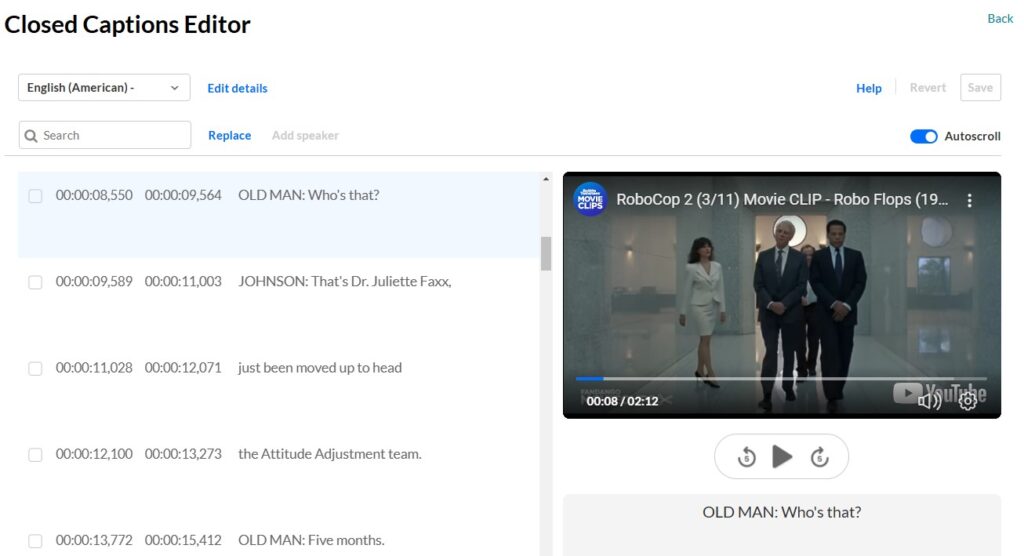
Use the speaker’s name, role, or other clear identifier (e.g., Dr. Dickerson, Presenter, or Old Man). Some captioners use bold font for these identifiers, but Kaltura does not support rich text formatting. Styles may also include putting speaker identification in parentheses or brackets. We typically use ALL-CAPS with no brackets or parentheses, followed by a colon. The key is to choose a single format and apply it consistently throughout your captions.
Ex 1: Presenter: Now moving to Slide 2…
Ex 2: [Presenter] Now moving to Slide 2…
Ex 3: PRESENTER: Now moving to Slide 2…
If only one person is speaking throughout the video and it’s visually clear who that is, we can skip identifying the speaker in every caption. For example, in a lecture video featuring just you, it’s not necessary to label each line of dialogue. Use speaker identifiers only when necessary to maintain clarity without overwhelming the viewer. Figure 3 illustrates the usefulness of speaker identification.

Figure 3: Clear Speaker Identification
Critical Non-speech Sounds
Speech is often not the only sound heard in a video. Describe non-speech sounds that add meaning or context to the video to give the non-listening viewer equivalent context. These sounds could be:
- environmental sounds like [cell phone ringing] or [triumphant music],
- actions or movements like [marker writing] or [cough] (to clarify a spoken “Excuse me”), or
- audience reactions like [laughter].
The deciding factor is that if the sound adds meaning, it belongs in the captions. Sounds that don’t add meaning or context might include faint background noises or unrelated chatter. Omit these sounds to avoid overwhelming captions with excessive or overly descriptive sound cues.
Descriptions should be concise, specific, and distinct from spoken text for readability. Avoid past tense. In our experience, the most prevalent format is to place descriptions of sounds in square brackets. (You can use parentheses, but we reserve parentheses for another purpose in descriptive transcripts, which we’ll cover in a later post.) Figure 4 shows our method. For this particular video, we also adjusted the auto-generated time stamps to correctly synchronize the caption with what is happening in the video.
![In the Kaltura CC editor, right, a video clip from RoboCop 2 with four spotlights in the dark. Left, captions indicate time-stamps of non-speech sounds: [shooting], [yelling], [machinery moving], [heavy breathing], [ominous music].](https://commonwealthteaching.psu.edu/wp-content/uploads/2025/01/Figure-4-Captioning-Non-Speech-Sounds-1024x592.jpg)
Figure 4: Critical Non-Speech Sounds
Time to Caption
Creating high-quality captions is an investment of time, but it’s one that pays off in accessibility and inclusivity. Editing captions can take anywhere from a few minutes to an hour per video, depending on its length, complexity, and audio-quality. A good rule of thumb is to budget 3–5 times the video’s runtime for editing. For example, a 10-minute video might take approximately 30–50 minutes to refine captions.
Better and Better
High-quality captions are an accessibility responsibility that benefit all learners. Captions make content searchable, reinforce comprehension, and support those working in noisy environments or experiencing technical limitations. Creating captions can even improve your teaching by encouraging you to think critically about how your materials are structured and communicated.
As you prepare captions for videos you plan to post in Canvas and as you develop your own style, keep in mind the three essential elements of high-quality captions: correct spoken dialogue, clear speaker identification, and critical non-speech sounds. In Part 3 of this series, we’ll explore transcripts—similar to captions, but different in important ways.
Additional Resources
We recommend uploading all your media to your Kaltura account to leverage the following benefits:
- Editable Captions: Kaltura provides a simple, intuitive interface for editing captions.
- Greater Accuracy: While not perfect, Kaltura’s auto-generated captions are generally more accurate than those of Zoom or YouTube, and they include basic punctuation for easier editing.
- Zoom Integration: All your Zoom recordings are automatically uploaded to Kaltura.
- YouTube Compatibility: Captions on YouTube can be edited only by the content owner. If editing is needed, import YouTube content to Kaltura for auto-generation and editing.
- Canvas Integration: Kaltura videos can be embedded directly into Canvas and display in an accessible player that ensures captions are visible and easy for students to use.
If you are new to Kaltura, visit What is Kaltura? (Pathways to Pedagogy) to learn more.
For technical instructions on selected processes, visit the following articles in the public Penn State IT Knowledge Base:


0 Comments